Thursday, May 27, 2010

Ritz Chicken

Ok here is a start on the recipes I promised back in THIS post. This recipe is for the start of the month next week. The first Tuesday of the month is Ritz Chicken. One of our family staples, mainly because it's easy, yummy, and fool proof. Oh and because I don't have to use a recipe! It's so simple!
So here is what you need some Ritz Crackers, a stick of butter and chicken. That's it!

Drop Ritz into bag. One sleeve to two sleeves (depending on how much chicken; 2 sleeves do 8 chicken). So if I'm doing 6 chicken I use a sleeve and a half of Ritz. Get the picture.

Crush Ritz so that they are unrecognizable. I've had it where the crackers are chunky and I didn't enjoy it as much. Plus people are more impress when they don't know what you used.

Melt your butter, drudge chicken into butter then in the bag of Ritz, place on the baking sheet. ~Here is my spin I usually pour some Ritz on my pan so that the under side of the chicken has extra.~

I usually have extra butter left which, I then pour on the top of my chicken. Then with whatever crumbs are left I will pack those on the top.
Ok so I almost didn't post this picture because it's not pretty. My butter got away from me but then again... this is usually how my pan ends up and it still looks good at the end. Don't be afraid to get messy.

Bake at 350 for 30-35 min. Or if chicken is frozen 40-50 min.

Doesn't that look yummy! I know! Because I got to eat it after this picture!

Here is my secret in my Meal Schedule I have a star by my Ritz chicken. Which means that I will be using my extras later that week. So with the star by the chicken I make extra chicken (and salad) so I can use it on chicken salads the next day. So Wednesday's dinner is done too! I just reheat my chicken throw it under the broiler for a few to get crispy and TA-DA!
Linked to:

Saturday, May 22, 2010

Show the Love

Ok girlies, I see you coming but now it's time to show the love! I have decided to do a giveaway... but not until I have a reason to. My follower count is at ZERO, really, 0? Hhh which makes me feel a little lame. SO I will do an awesomely cute giveaway but only when I reach 50 followers. Oh and maybe you'll have an advantage if you're one of the first 10 followers, like you're name will be entered twice in the giveaway. And trust me you WANT to be in the giveaway!
It's easy fun and free! All you have to do is to sign up right over there -----> and become my follower. And did I mention I love comments? Oh and it doesn't hurt to add me to your blog list and such! If you like the things I do and you don't know me that's great, I love having new friends! If you do know me, well let me just say... you should have already signed up... but I guess will give you a second chance!
Oh I feel better already!

Monday, May 17, 2010

Family Picture Book

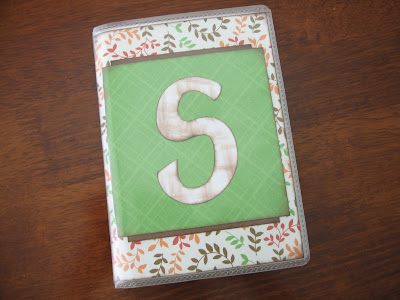
This project I made at Christmas for one of the families that lives out of state. It's perfect for little ones to get to know (or remember) their family that is far away. This is our Stapley Family Book.
You need 12x12in classic woodland paper pad (Martha) from Wal-mart (makes two books)
(I like the paper cuz it isn't too girly and all the paper matches)
Photo book - $1 @ Wal-mart (36 pages)
Pictures of individual family members
Printed names on white cardstock
(Today I like parentheses)

I didn't print it out yet but I plan on having this on the left side.
God gave us families to help us become what He wants us to be—
This is how He shares His love, for the family is of God.
Sorry I didn't do that before this picture.

I cut the 12x12 paper down to size. I could get 4 sheet of the 4x6 size (I actually think it is slightly bigger than 4x6 cuz I didn't want them sliding around in the sleeves) and 2 slightly smaller ones from one 12x12 sheet. The 4x6ish are the main sheet and the slightly smaller are the mounting sheets for the names, and title pages. It worked out great because I hate wasting paper and I didn't have much extra.

I inked every sheet of paper. (If you don't like spending a million years inking things forget this step.) I do have to say... it makes it super CUTE though!

With the pictures I just made sure they were square. Then it doesn't matter what kind of pictures you get from your family they can be tall or landscape. Don't be afraid to cut off the tops of heads (to a certain extent).


I split my book up by categories ie Cousins, Aunts/Uncles, but you can to it in families if you would like.

I had couples together.


Ta-DA! Done.
Side note: this book is great not only for recognizing family members but also, for little ones to recognize letters and helps with reading. My 3 year old knows who the picture is of and then will trace the name with her fingers, like she is reading.
(Oh and it makes a great quiet book at church too.)
*Mamma-law got the idea from Sister-in-law (who made a Family Memory game)

Wednesday, May 12, 2010

Mod Podge Initial

What you need, $3 frame from Wal-mart, white bead board, initial letter, cute paper, sandpaper, black paint, stain, saw, wood glue, staple gun, and paint brushes.

Sand your initial, wipe down and paint.

Trace your letter face down on the back of your cute paper. Cut out slightly inside the lines traced. Trim if needed. Then Mod Podge on to the front of the letter. Distress your letter if wanted.

Cut a piece of bead board to fit your frame (I used the glass to cut the right size). Sand the front of the bead board just enough that the stain will stick. Paint stain on and wipe off to desired look.

I put a bit of wood glue on the initial and then used my staple gun to keep it in place.
Ta-da, done.
*Got the idea from Miss Crafty Pants and then added my twist.

Friday, May 7, 2010

Mother's Day Card

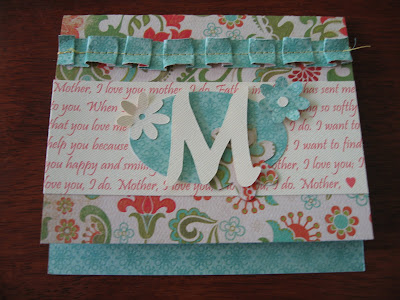
We just had a card class last night and this is the card I made.

Here is how to make it. I found some cute 12"x12" DOUBLE SIDED paper.
I also got an 8.5"x11" of a cream that went with it.

Trim one side down to 10"

Flip your paper to the 12" side and cut it in half. So you should now have 2 sheets that are 10"x6".

Fold the card not quite in half, so that your top flap is about 3/4 inch shorter.

Then take the 2" piece you cut from the beginning and cut about a 3/4 inch strip.

Fold it into ruffles, they don't need to be even.

Then sew on the front. Make sure your card is open. Use your fold as a guide.

You can use whatever color you have really. I had a blue bobbin and yellow for the top.

The blue blended on the inside, but an accent color would be cute too.

Then I took my 8.5"x11" cream and printed "Mother, I love you" in a 'Pristina' font and set the side margin to 6". Make sure your alignment is set to justify full. I made the font size just big enough to have the song cover about 2 inches in height. I had a space at the end so I put a heart using 'Bookshelf Symbol 7' font the 'w' makes a heart. In a pinkish color the key is Red 255, Green 80, Blue 80.
*If you have never hear Mother, I love you listen HERE!

Trim it down to size after printing it and paste on.

The next part I used a Cricut to cut out my shapes. The M is Jasmine 'shadow blackout'. And the shapes are George, the oval is 'real size' 3" and the flowers are 1" reg. (cream) and 1" 'shadow blackout' (blue). The patterned flower is 1.5" shadow blackout.

Glue them on. The oval the cream flower and the big flower get glued on. Since the cream flower hangs off of the side of the oval I only glued the side that's on the oval.

The M and blue flower get popped.

And now it's time for pop'n everything. I popped the peddles on the blue flower.

Half on the cream.

Now pop the ruffles.

And your done!

Happy Mother's Day!

Wednesday, May 5, 2010

Ribbon Ribbon Ribbon

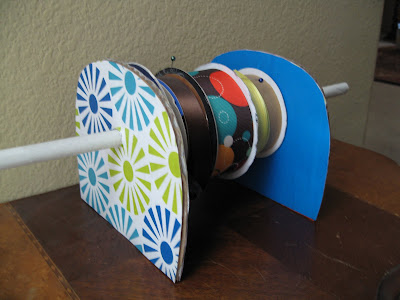
Ribbon can get messy it gets shoved places and forgotten then you buy more (of the same kind) then it too gets wadded up and shoved somewhere else. Here is an easy fix.
Find some cardboard (mine is a baby wipes box). Trace a tupperware lid and make a straight cut for the bottom (the lid should be bigger than any of your spools of ribbon). Poke a hole in the upper middle using a pen, line up the second using the first as a template so the holes match. Mod Podge both sides with cute paper. Then take a cardboard pant hanger and pull off the rod part this will be your dowel. You may need to poke your spools of ribbon with a pen too to fit on the rod.


Then if you don't have spools for some, cloths pin them to the edge.


Easy, fast, free, organized.
I think next time I will try a double stacker.

Tuesday, May 4, 2010

Popcorn Popping

Here is a fun mommy tip. Did you know that popcorn is a grain, and is naturally high in fiber? Also that fiber cancels out sugars that you eat? So it's a good snack food for your kids. We usually have the kind with extra butter which probably takes the health factor down a bunch (but for my skinny kids you have to fatten them up somehow, right?) Well anyways. Yesterday for snack time we had popcorn, and mommy took a break and ate it too.

*picture found on Google image
Here is what was so fun about it, you know how when the clouds are really fluffy and you can make pictures out of them. Well we did that with our popcorn. It was fun mommy time and learning time. Some looked like animals we don't always talk about like a platypus. Kya was able to use her imagination and learn new things. Plus we ate popcorn!