Showing posts with label paper. Show all posts

Monday, January 31, 2011

Cards

I feel like I've been crafting away but not sharing all of my crafts with you so I have some cards I have made recently and more crafts to come!
I had some scraps of the cute pink paper and so I thought I could make something pretty. Since Valentine's Day is just around the corner... I may use them for that. But really they could go for anything if you want something pretty that is.


This flower really needs a close up! (Here is my secret: 4 small squares of double sided paper, folded twice and ta-da!)

And it seems to me that every time I have a wedding to go to I have NO cards that would even look good... So I made these. Plain paper, a few shapes, some folds, add some lace and ta-da!

This is just my favorite thank you card and I don't think I'll ever give it away!


Monday, December 13, 2010

Cute Magnet Board

This is what I made for my sister in law for Christmas. This year for the gift exchange we set a dollar limit on the gifts, and I came up with this magnet board/recipe holder.

I totally forgot to take a before picture but it looked a little like this ming porcelain plate except it was tin and you could tell it wasn't porcelain. It was a whopping .50 cents at a thrift store.

I spray painted the edges white, and found some cute scrapbook paper, which I then Mod Podged to the middle.

Lately I have been kind of obsessed with keeping all bottle caps off of our drinks and so I took a few Izzy's caps. (I love izzys)! I covered one of them just so I could have more orange but I didn't even have to cover the others because they are so cute. The things that I had on hand made it easy to stay in the budget but if you had to buy the Izzy's, paint, paper, magnets and cloths pins you would still have a pretty cheap gift!

Covered a couple clothes pins and stuck magnets on them and TA-DA! A very cute $1 gift.


Linked up with:

Monday, December 6, 2010

Snowflake Decorations for Cheap!

I love decorating with snowflakes around this time. Maybe it's because where we live in AZ there is no snow: it's a chilly 71 degrees outside right now! And I love hanging stuff from my ceiling, it just makes things look so much cuter!
So here is my winter wonderland! Want to know how to make the big snowflakes? I'll show you!

Here is what you need: White lunch bags, scissors, tape, and string.

Fold in different places and cut whatever feels good. Let me give you a tip: there is so right or wrong way even if you think the cut looks silly*, once they are open they look great. And snowflakes are all different so have fun experimenting with different cuts.

On some of my snowflakes I alternated two different cuts and on some I didn't.
(*See how mine look like chicken and boobs... they turn out cute when you open them.)

Once you have cut your bags to your hearts desire, now it's time to start taping. Don't open your bag, just tape the edges together near the bottom. You will be taping one side each, to the other.

Make sure your bottom is folded up still and pinched with the sides as you tape.

Let me show you a little closer make sure the V is pinched down before you tape.
You don't want the V.
Bad / Good

Once you have taped all of your bags together it should look like this

Here is a different design.


Then hang! Ta-da!


I love it! It would be so cute if you were having a party to put them up all over with some of those tissue paper pom poms.

So let it SNOW. let it SNOW, let it SNOW!
Then I tied it into my other decorations by wrapping some presents with snowflake paper.

Wednesday, October 13, 2010

Boo Season

BOO!

Well it is that time again! One of my favorite things to do in October is to "Boo" people! You know where you make treats and a cute little saying that says that they have to boo two others. Well we have been making treats and booing people lately and the kids really like helping mix the treats, licking bowls clean, eating the left over treats and then of course Booing houses! So here is my Mommy tip: find ways to let your little ones help... even if it means making a mess or getting caught at some of the houses, they will feel the joy of helping and serving others!


Here is another fun project that is easy and a good one for little ones to help.

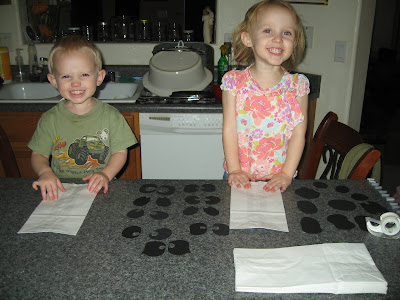
Here is what you need: white paper bags, some black paper cut into eyes and mouths, and tape (or if your kids are older and can use glue that works too).

Oh and you'll need a cute kid or two to help.

Put the tape on the eyes and mouth and stick them on the bags.


This is what we ended up with.


We also made bats!

Our house looks way better with our paper decorations up!
Linked up with:

Tuesday, July 27, 2010

Your Sweet Card

Let me first say that this card was just in my head, (I didn't even copy it from anyone!) and it wanted to come out and it turned out SO cute! It did take a couple of tries to get it there but now look how CUTE! (Let's see how many times I can say CUTE!)

So here is how to do it! Take a cream 8.5" x 11" sheet of paper print "Your Sweet" in pink where you want it (trial and error really.) I put my page to landscape and entered down till it looked just under the halfway point. Printed a test sheet, it wasn't quiet down far enough but a whole return would have been way off so I changed the font size of the spaces above it and got it where I wanted it. (That was very long winded just for a simple step sorry!) Now cut the 11" side down to 6" and fold in half.

Then on some dark pink I printed "{with a cherry on top}" in chocolate brown, this too was trial and error of where I wanted it on the paper. If it's too far in just trim to fit the card.

Now take your cute chocolate and pink cream paper, I found mine at Joann's fabric, and trim down to 3.5" x 6". Glue on the front.


Then embellish with staples! On this part make sure your card it open.


On to the matte of the cupcake, cut a 3.5" circle out of brown. Then cut an inch cream strip and a slightly larger light pink strip and stapled them across the circle, trim the off the edges to match the circle.


Next is the cupcake. I got a piece of cardstock spay adhesive-d tin foil on to the front and back cut out a trapezoid looking shape and then crimped it with my crimping iron! Yes my crimping iron from the 80's because I don't have one for paper, although that would probably work well too!
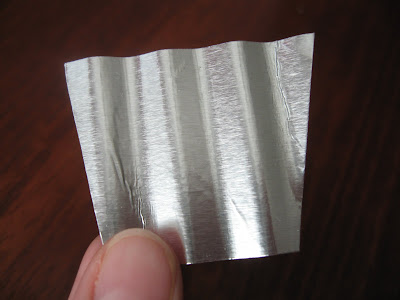
Hot glue it on to the circle.

For the top of the cupcake I cut freehand, just make it a squiggly half circle-ish cupcake top. Then crumple it.

Hot glue a dark pink button on top.

Pop the top with a pop dot.

I was going to end with this but I found some beads for sprinkles that I couldn't pass up.

So I used regular glue to glue my "sprinkles" on.

It's so cute, I could almost eat it!

Then use two pop dots to pop the matted cupcake onto the card and TA-DA, CUTEST card in town!

Linked up with: