Showing posts with label cards. Show all posts

Monday, January 31, 2011

Cards

I feel like I've been crafting away but not sharing all of my crafts with you so I have some cards I have made recently and more crafts to come!
I had some scraps of the cute pink paper and so I thought I could make something pretty. Since Valentine's Day is just around the corner... I may use them for that. But really they could go for anything if you want something pretty that is.


This flower really needs a close up! (Here is my secret: 4 small squares of double sided paper, folded twice and ta-da!)

And it seems to me that every time I have a wedding to go to I have NO cards that would even look good... So I made these. Plain paper, a few shapes, some folds, add some lace and ta-da!

This is just my favorite thank you card and I don't think I'll ever give it away!


Wednesday, August 11, 2010

A GREAT BIG THANKS! (giveaway)

Ok girlies, let me just say that I am so so happy! I said that I would do a giveaway when I got to 50 followers and guess what... with the subscribers in Google reader plus my followers I have 52!YEAH, YAY, YEAH! Jumping up and down, I feel so special right now! You guys are the best! Really, I'm so flattered that most of my followers are people that I have never met! So thank youand I'm so excited to have you as my "blog friends"! So to say thank you I'm doing a handmade giveaway, I have made, with my own hands, 25 cards that I'm going to be giving to a lucky reader!

(just a little preview)

All you have to do is to be a follower or subscriber and then comment on this post. That's all! I would love to know who some of my subscribers are so if you are let me know!
Edit: The giveaway will close next Wednesday 18th at 12 midnight. I will pick a winner the 19th!

Tuesday, July 27, 2010

Your Sweet Card

Let me first say that this card was just in my head, (I didn't even copy it from anyone!) and it wanted to come out and it turned out SO cute! It did take a couple of tries to get it there but now look how CUTE! (Let's see how many times I can say CUTE!)

So here is how to do it! Take a cream 8.5" x 11" sheet of paper print "Your Sweet" in pink where you want it (trial and error really.) I put my page to landscape and entered down till it looked just under the halfway point. Printed a test sheet, it wasn't quiet down far enough but a whole return would have been way off so I changed the font size of the spaces above it and got it where I wanted it. (That was very long winded just for a simple step sorry!) Now cut the 11" side down to 6" and fold in half.

Then on some dark pink I printed "{with a cherry on top}" in chocolate brown, this too was trial and error of where I wanted it on the paper. If it's too far in just trim to fit the card.

Now take your cute chocolate and pink cream paper, I found mine at Joann's fabric, and trim down to 3.5" x 6". Glue on the front.


Then embellish with staples! On this part make sure your card it open.


On to the matte of the cupcake, cut a 3.5" circle out of brown. Then cut an inch cream strip and a slightly larger light pink strip and stapled them across the circle, trim the off the edges to match the circle.


Next is the cupcake. I got a piece of cardstock spay adhesive-d tin foil on to the front and back cut out a trapezoid looking shape and then crimped it with my crimping iron! Yes my crimping iron from the 80's because I don't have one for paper, although that would probably work well too!
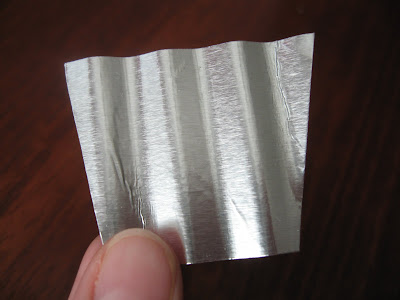
Hot glue it on to the circle.

For the top of the cupcake I cut freehand, just make it a squiggly half circle-ish cupcake top. Then crumple it.

Hot glue a dark pink button on top.

Pop the top with a pop dot.

I was going to end with this but I found some beads for sprinkles that I couldn't pass up.

So I used regular glue to glue my "sprinkles" on.

It's so cute, I could almost eat it!

Then use two pop dots to pop the matted cupcake onto the card and TA-DA, CUTEST card in town!

Linked up with:

Sunday, June 20, 2010

Father's Day Card

All you need is some plain paper and some patterned paper. Cut your 8.5 x 11 plain paper in half length wise. Fold it in half with the fold at the top. Cut slits about 1 inch from the fold. Fold down to make a collar cut out a tie, glue tie into collar. Paste buttons on and your done.

Friday, May 7, 2010

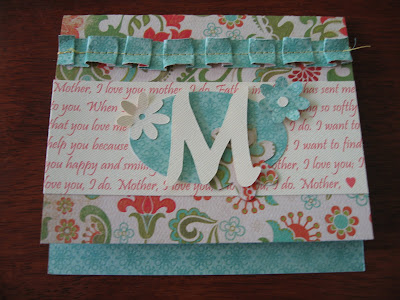
Mother's Day Card

We just had a card class last night and this is the card I made.

Here is how to make it. I found some cute 12"x12" DOUBLE SIDED paper.
I also got an 8.5"x11" of a cream that went with it.

Trim one side down to 10"

Flip your paper to the 12" side and cut it in half. So you should now have 2 sheets that are 10"x6".

Fold the card not quite in half, so that your top flap is about 3/4 inch shorter.

Then take the 2" piece you cut from the beginning and cut about a 3/4 inch strip.

Fold it into ruffles, they don't need to be even.

Then sew on the front. Make sure your card is open. Use your fold as a guide.

You can use whatever color you have really. I had a blue bobbin and yellow for the top.

The blue blended on the inside, but an accent color would be cute too.

Then I took my 8.5"x11" cream and printed "Mother, I love you" in a 'Pristina' font and set the side margin to 6". Make sure your alignment is set to justify full. I made the font size just big enough to have the song cover about 2 inches in height. I had a space at the end so I put a heart using 'Bookshelf Symbol 7' font the 'w' makes a heart. In a pinkish color the key is Red 255, Green 80, Blue 80.
*If you have never hear Mother, I love you listen HERE!

Trim it down to size after printing it and paste on.

The next part I used a Cricut to cut out my shapes. The M is Jasmine 'shadow blackout'. And the shapes are George, the oval is 'real size' 3" and the flowers are 1" reg. (cream) and 1" 'shadow blackout' (blue). The patterned flower is 1.5" shadow blackout.

Glue them on. The oval the cream flower and the big flower get glued on. Since the cream flower hangs off of the side of the oval I only glued the side that's on the oval.

The M and blue flower get popped.

And now it's time for pop'n everything. I popped the peddles on the blue flower.

Half on the cream.

Now pop the ruffles.

And your done!

Happy Mother's Day!