Wednesday, October 3, 2012

Almond Joy Ice Cream


So every year my Grandma & Grandpa have a Homemade Ice Cream Contest and this year I put together a pretty darn yummy one.  I made it because I had just made THIS Almond Joy Popcorn Munch from Inside BruCrew Life, and thought it would be great as ice cream so here is what I concocted.

Almond Joy Ice Cream

1 cup almond milk
14oz. cream of coconut (find it in the booze isle)
1 ½ cups heavy cream

1 ½ cups sweetened flaked coconut (toasted)
1 ½ cups sliced almonds (toasted)
1 cup chocolate of choice (melted)
1-2 cups chopped Almond Joy candy bars

Toast coconut and Almonds (lay out on wax paper)
Melt chocolate and drizzle over the coconut and almonds.  Let harden.  Break up into bit size pieces.  Wisk almond milk, cream of coconut, and heavy cream together. 
Dump everything into ice cream freezer, and freeze.

Thursday, July 12, 2012

Baby Shower Applique and Bow

Had another baby shower to go to.  I whipped this up a half hour before it started... maybe I need to start making them BEFORE I need them.


Thursday, May 24, 2012

Mother's Day Card

This is the Mother's Day card that I made for my Mom and Mama-Law


The inside says "All flowers remind me of you" and "I give you my love with each flower.  From this lovely song:  I Often Go Walking 


Thank you Martha for the lovely idea... but when it says it only LOOKS complicated on her website, it's a lie because it takes some skill. 

Monday, April 23, 2012

My Front Door Decor

There are not words that can describe how thrilled I am about my framed wreath on my front door!  You know how on Despicable Me when the little girl says, "It's so fluffy I'm gunna DIE!"  Well, while I've been making this project I have been saying, "It's so cute I'm going to DIE!"  I'm glad that I have a 5 year old girl to share in my joy, she has been validating every statement and completely agreeing with me, I just love it!  I love the random-ness... the colors... the polka dots... well you get it everything, I LOVE EVERYTHING about this beauty.
I set out to make this because my front door was BAD it had very hideous tape marks, and a bad paint job that needed some hiding.  (I would love to just paint the whole darn thing but we are renting, and I am not about to go through that much work for someone else's door.)  My challenge was that there were things that needed to be hidden that were under as well as over the peep hole, but yet I still wanted to be able to see out of the peep hole.  Now all the big problem spots are hidden and the cuteness detracts from any other flaws on the front door!


This took me about a day to make and it was pretty cheap too!
What you need:
Frame - from Goodwill $3
Willow wreath - from Dollar Tree $1
Letter initial - Hobby Lobby $1
a few different kinds of ribbon, some spray paint, craft paint and a glue gun.
And TA-DA!


Tuesday, April 10, 2012

Home Sweet Home

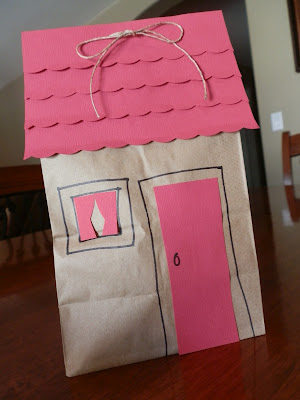
So here is one of the many reasons that I have not been around this blog.  We moved!  And to thank the neighbors that helped us move I made goody bags.  I folded down the flap and wrote a thank you note right on the bag.
Paper bag... check
Colored paper... check
Sharpie... check


The yummiest cookies to go inside... CHECK!


Scalloped four strips of paper and cut a door and curtains, then outline with a marker.
Didn't they turn out super cute!


Monday, March 26, 2012

Jar Chandeliers

Wow it's been busy around here!  I have felt the void of posting around here but it hasn't been on the top of the list.  I have crafted up some fun lately though, I have been dying to make a chandelier out of jars for a very long time and I finally had an excuse to make some and my how nice they turned out!  Here are the beauties!  Made them out of round cooling racks (I think) that I found at Savors, chain, wire, and recycled jars.  Now I just need to find a place for them to stay I love them so much!


Wednesday, January 11, 2012

A-Frame Tent Cheap!

This is what my kids got for Christmas, a tent.  And NO Santa didn't bring it, mommy made it...  I just couldn't give the Fat Man credit for this one.


So here is what I did, I started out with this tutorial... DIY A-Frame Tent
but did it a little bit different.  She uses a wooden dowel on top, and elastic for the ends of the tent.  I decided that I would rather replace PVC than a wood dowel if my kids get crazy with it.  Also I thought that I could make my cover less droopy if I hemmed the ends and put PVC through it.
So here are the materials that I used:

2 pieces of wood, 1x3x10 (had Home Depot cut them in half) and (if they are not sanded you can tell them to smooth them out for you too)
2 pieces of 3/4" PVC 10 feet long
6 end caps for the PVC
material/sheet (I got my material free from a friend, but you could get a sheet second hand and it would not cost much)
twine or hemp (on hand)
drill with crown drill bit
sand paper

So since my fabric was free and I had hemp and tools, my total was $13!

First off I drilled a 7/8" hole in my boards. Sanded them, then I wrapped and tied the hemp around the boards as shown.  This was ingenious... I knew it would hold my boards together and make the hole a little more snug but I didn't know that when you put the PVC through and spread the boards it squeezes the PVC tightly AND makes it so that the tent can't collapse, ingenious, like I said.


As for the PVC I cut one of the 10' pipes a little LONGER than 5' for the top so that we could hang things on the outside of the tent. Then for the other pipe I cut it exactly in half so I had two 5' pipes for the bottom of my material to hold it tight.
So you put your PVC through and then spread the legs place the end cap on the PVC and repeat for the other side.


Throw the material over and feed the pipes through the bottoms and TA-DA!
What I love about the pipe being on the top of the tent is that the kids can hang flashlights from carabiners, which they love.


And this is all the space you need to store it!